Lanjutkan langsung ke sini ada beberapa tampilan keren dari sebuah foto. Foto yang biasa jadi luar biasa!! Keren, cuma sekarang lagi gak sempet liat satu satu, jadi di simpen dulu ya... next setelah pekerjaan selesai, baru dibuka buka lagi ^^

Tampilkan postingan dengan label tutorial Photoshop. Tampilkan semua postingan
Tampilkan postingan dengan label tutorial Photoshop. Tampilkan semua postingan
Selasa, 27 Desember 2011


Kamis, 08 Desember 2011
sewing tutorial
serunya menjahit. Cuma sekarang masih belum bisa menjahit nih, soalnya suami lagi kena DBD, anak juga lagi manja, jadi gak bisa berbuat apa2. Cuma bisa liat video nya aja :)
ini beberapa tutorial hasil browsingan
ini seru, kursi yang bisa buat masukin baraang2 lainnya :)
nanti kalau ketemu tutorial bagus lagi, gw share langsung di blog :) biar gak lupa juga :D
love it!
Jumat, 18 Februari 2011
creating bubbles
Latihan membuat kita semakin pintar :D
cara membuat gambar seperti ini di Photoshop, biasanya dipakai untuk yang hobby buat digital scrapbook

linknya: http://digital-retouching.net/photoshop-tutorials/creating-pearls-and-bubbles
1. Open a blank document of 200px by 200px, 300dpi.
2. Choose the Ellipse Tool. From the options select the Fixed Size and set to width and height to 180px with white #ffffff as your foreground color. Make a single click on the working area to place the circle.
2. Choose the Ellipse Tool. From the options select the Fixed Size and set to width and height to 180px with white #ffffff as your foreground color. Make a single click on the working area to place the circle.

3. Click the Add a layer style button at the bottom of the Layer palette. Do the following settings respectively. Then click OK when you are done.

Color Overlay

Bevel and Emboss

Inner Glow

Inner Shadow
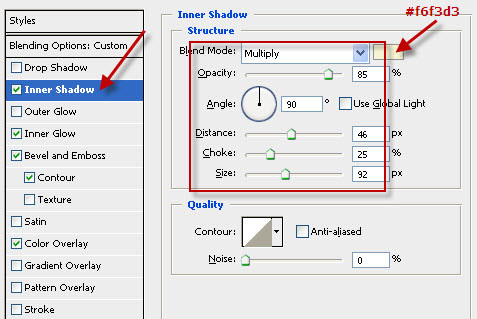
Satin

4. Done. As easy as that. If you want to create in another color, just change the color overlay and other color in settings.
Langganan:
Postingan (Atom)